Showing posts with label girly crafts. Show all posts

Monday, October 12, 2020

Erica and her sewing club make windsocks.

Along with presenting my pretty bohemian windsock tutorial, this is also an excuse to show off my crocheted dress.

It's been so long since I posted anything (although I have been sewing and crocheting like crazy... just not any DIY'ing or crafting) that I don't really remember how to. Let's see... write some boring backstory, write an instructional tutorial, add some pictures. Ok, here goes - 

I am a proud and happy member of American Sewing Guild. I have been for the past three years. It's a great group. Everyone is super friendly, knowledgeable and generous. Earlier this year, our sewing club chapter president, Kim, told us that if we wanted to present/lead a DIY class for one of our meetings, we would receive $10 in "ASG Bucks". These can be used toward our annual retreat (ok, cool 😀), ASG merchandise (nah 😒) and to buy stuff at our fabric swap/garage sales (YEEESSSSS!!! 😍😃😁). We all know how much I love buying fabric and sewing notions... I NEEDED those ASG Bucks. LOL Anyway, the only rules were that the project had to be relatively simple, can be completed in under an hour and fairly cheap (since the sewing club provides all the supplies needed). One of my favorite things is finding and doing fun & easy craft projects. I knew I had to sign up to lead a meeting even though I have never taught anything in my entire life and I have zero patience for humans. The meeting was last week and it went surprisingly well (beginner's luck, maybe). We made windsocks using embroidery hoops, fabric strips and ribbon. Everyone finished their project and had a lovely time. Here are the instructions.

DIY Windsock:

Kim bought the embroidery hoops and fabric with our ASG dues but all the ribbon came from the garage sale!! All.of.it. Now you see how amazing our garage sales are and why I need those ASG Bucks. LOL

Supplies needed: embroidery hoop (any size will do), 3 pieces of equal length string, 2-inch wide fabric strips (the length can be cut to your preference), scissors (Kim suggested using scrapbooking scissors or pinking shears to cut designs into the fabric strips), ribbon, lace, other decorative material, glue (optional)


1. Open the embroidery hoop and set the outside piece (the piece with the screw and fastener) aside. 

2. Tie the three pieces of string to the inside of the embroidery hoop to form a triangle. Gather the pieces of string together and tie them into a knotted loop at the top. This will be for hanging up the finished windsock.

3. Drape the fabric strips around the inside of the embroidery hoop. This is easier to do if the hoop is hanging from somthing (or a friend is holding it for you). If you're worried about the fabric strips moving out of place, put a dab of glue on it to stick it to the embroidery hoop.

4. Add ribbon, lace or any other decorative material over the fabric strips. Go crazy with color, patterns and texture! Kim suggest stringing beads or bells to the end of the pieces.

5. Once everything is draped in place, put the outside of the embroidery hoop back on (again, easier to do if you have a friend holding it for you). This will hold all of the fabric strips, ribbon, lace, etc. in place. Fastener it on tightly.

And we're done!! Hang it outside (or inside) and enjoy!! So pretty, right? 


Monday, February 23, 2015

Erica is making headbands!! (pt.2)

Continued from last week...
Yeah, I totally craft in my jammies. Ain't no dress code for bloggin'!
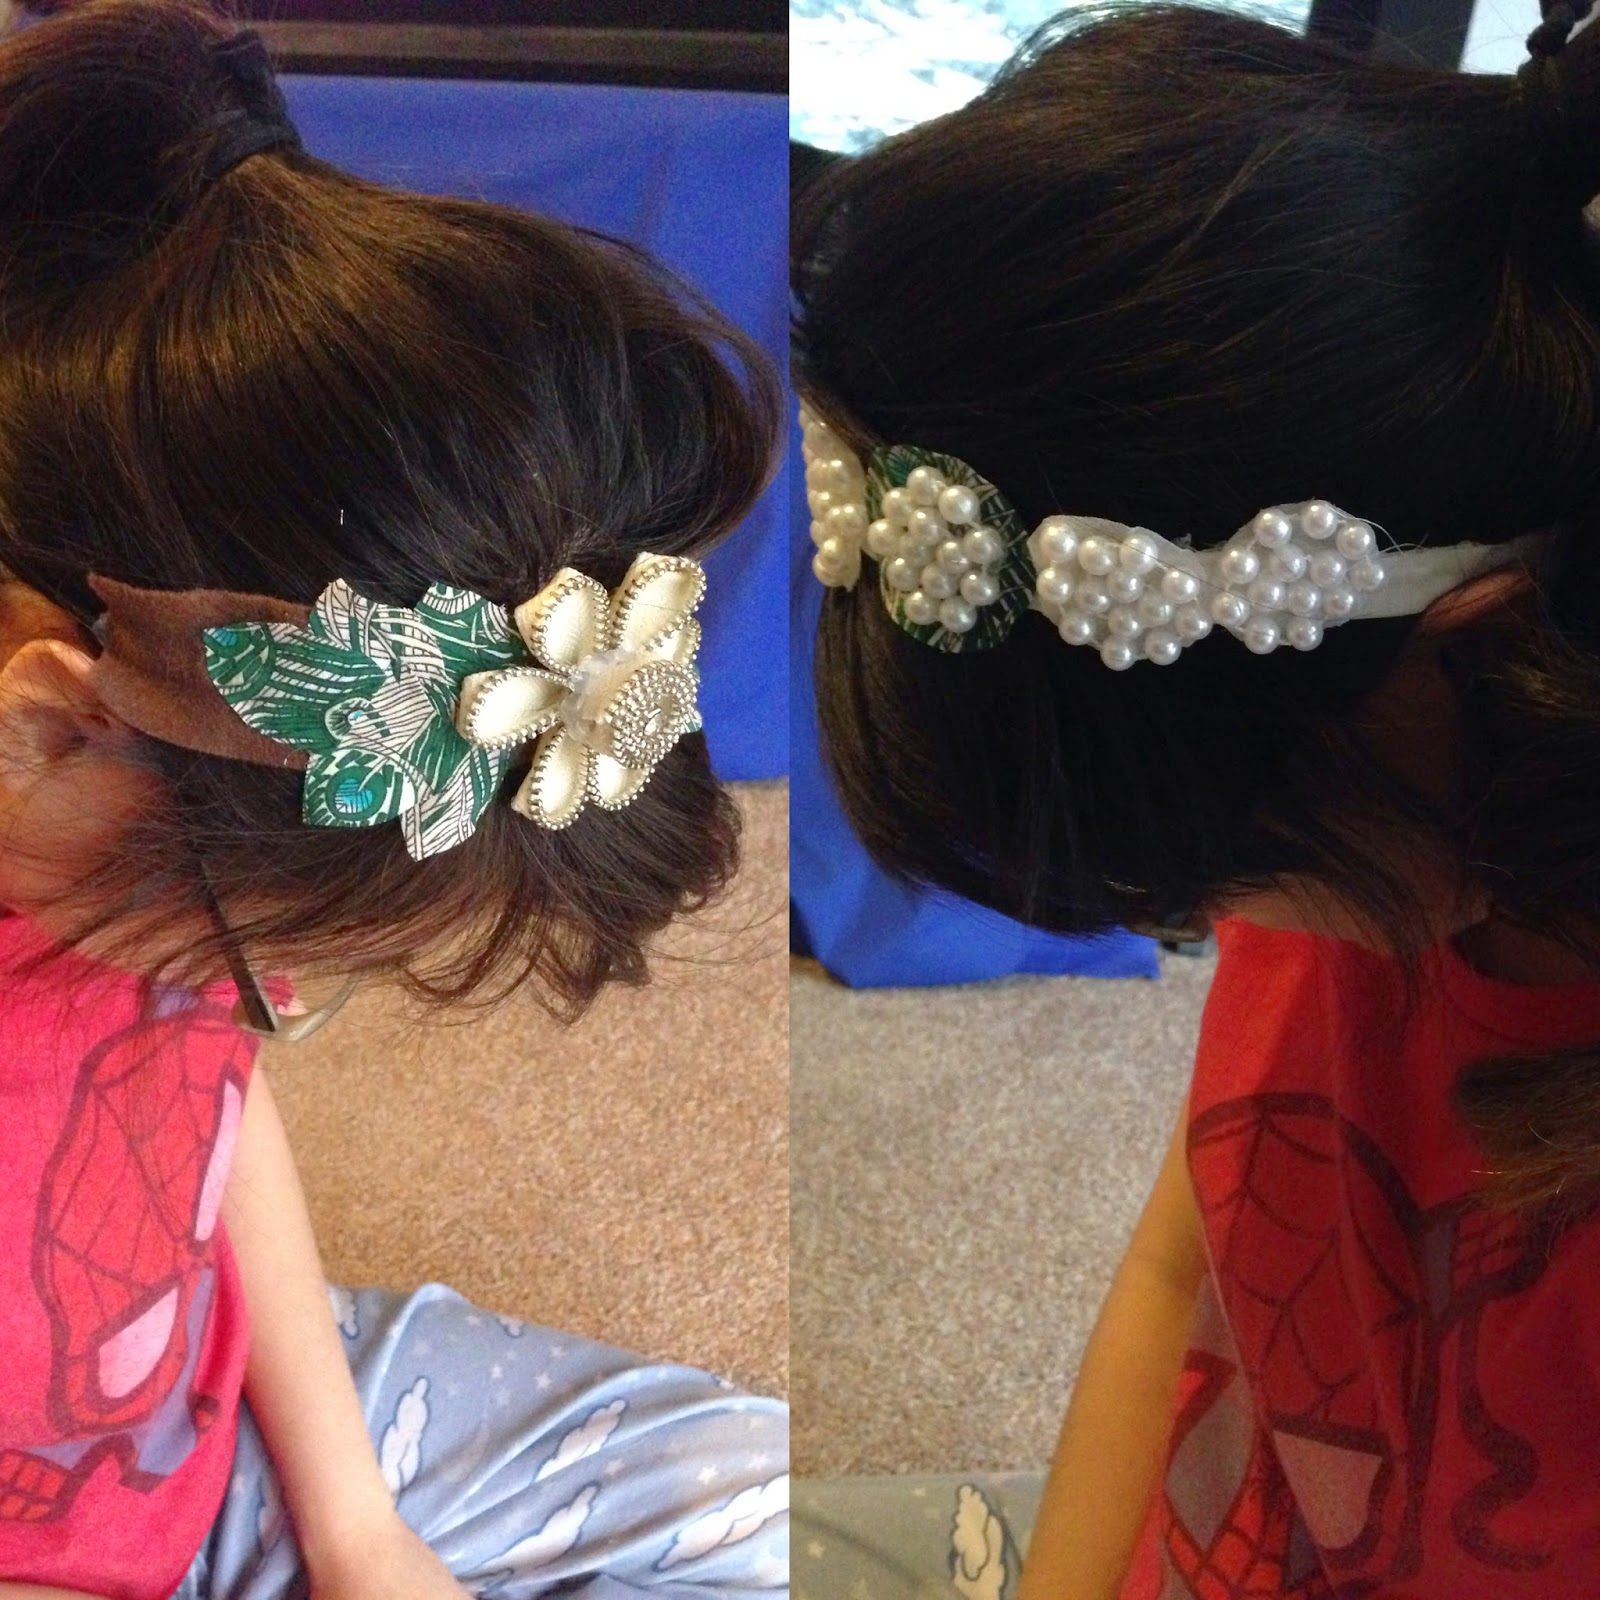
    Oh and I totally swapped Emma's headband for mine. The more I looked at hers, the more I kept thinking it wasn't her style. I really think the braided one suits her better. And now... Rachel, Elizabeth and I all have matching flower ones. The HCR department can be totes stylin' together! Hahaha.

Tutorial #3.
This one goes to a friend I've known for over 15 years. (they have song dedications...can I make craft dedications?) That's literally half my lifetime and a record in friendship for me. I'm not saying I don't keep in touch with people--because I try!-- but its SO HARD when friends move away for work or family or get overly consumed with said work and said family. But Lacey and I still manage to see each other about twice a month. And for that, I love her dearly.

Pearls headband tutorial:
Materials needed- elastic, cloth (I used two fabrics only because I wanted to incorporate some of the peacock cloth), string of pearls--mine is fake plastic costume jewelry, hot glue, scissors, and a  ruler

a. Cut a strip of cloth 15 inches long and 1 inch wide. I mainly chose those measurements because that's how wide my elastic is. Fold the cloth in half length wise and hot glue together. Now, glue each end to an end of your elastic. Headband made. Prettiness to come...
If I knew that all a headband was is a piece of cloth glued to some elastic, I would have 1. saved so much money my teenage years and 2. made so much money in my young adulthood making and selling these things!
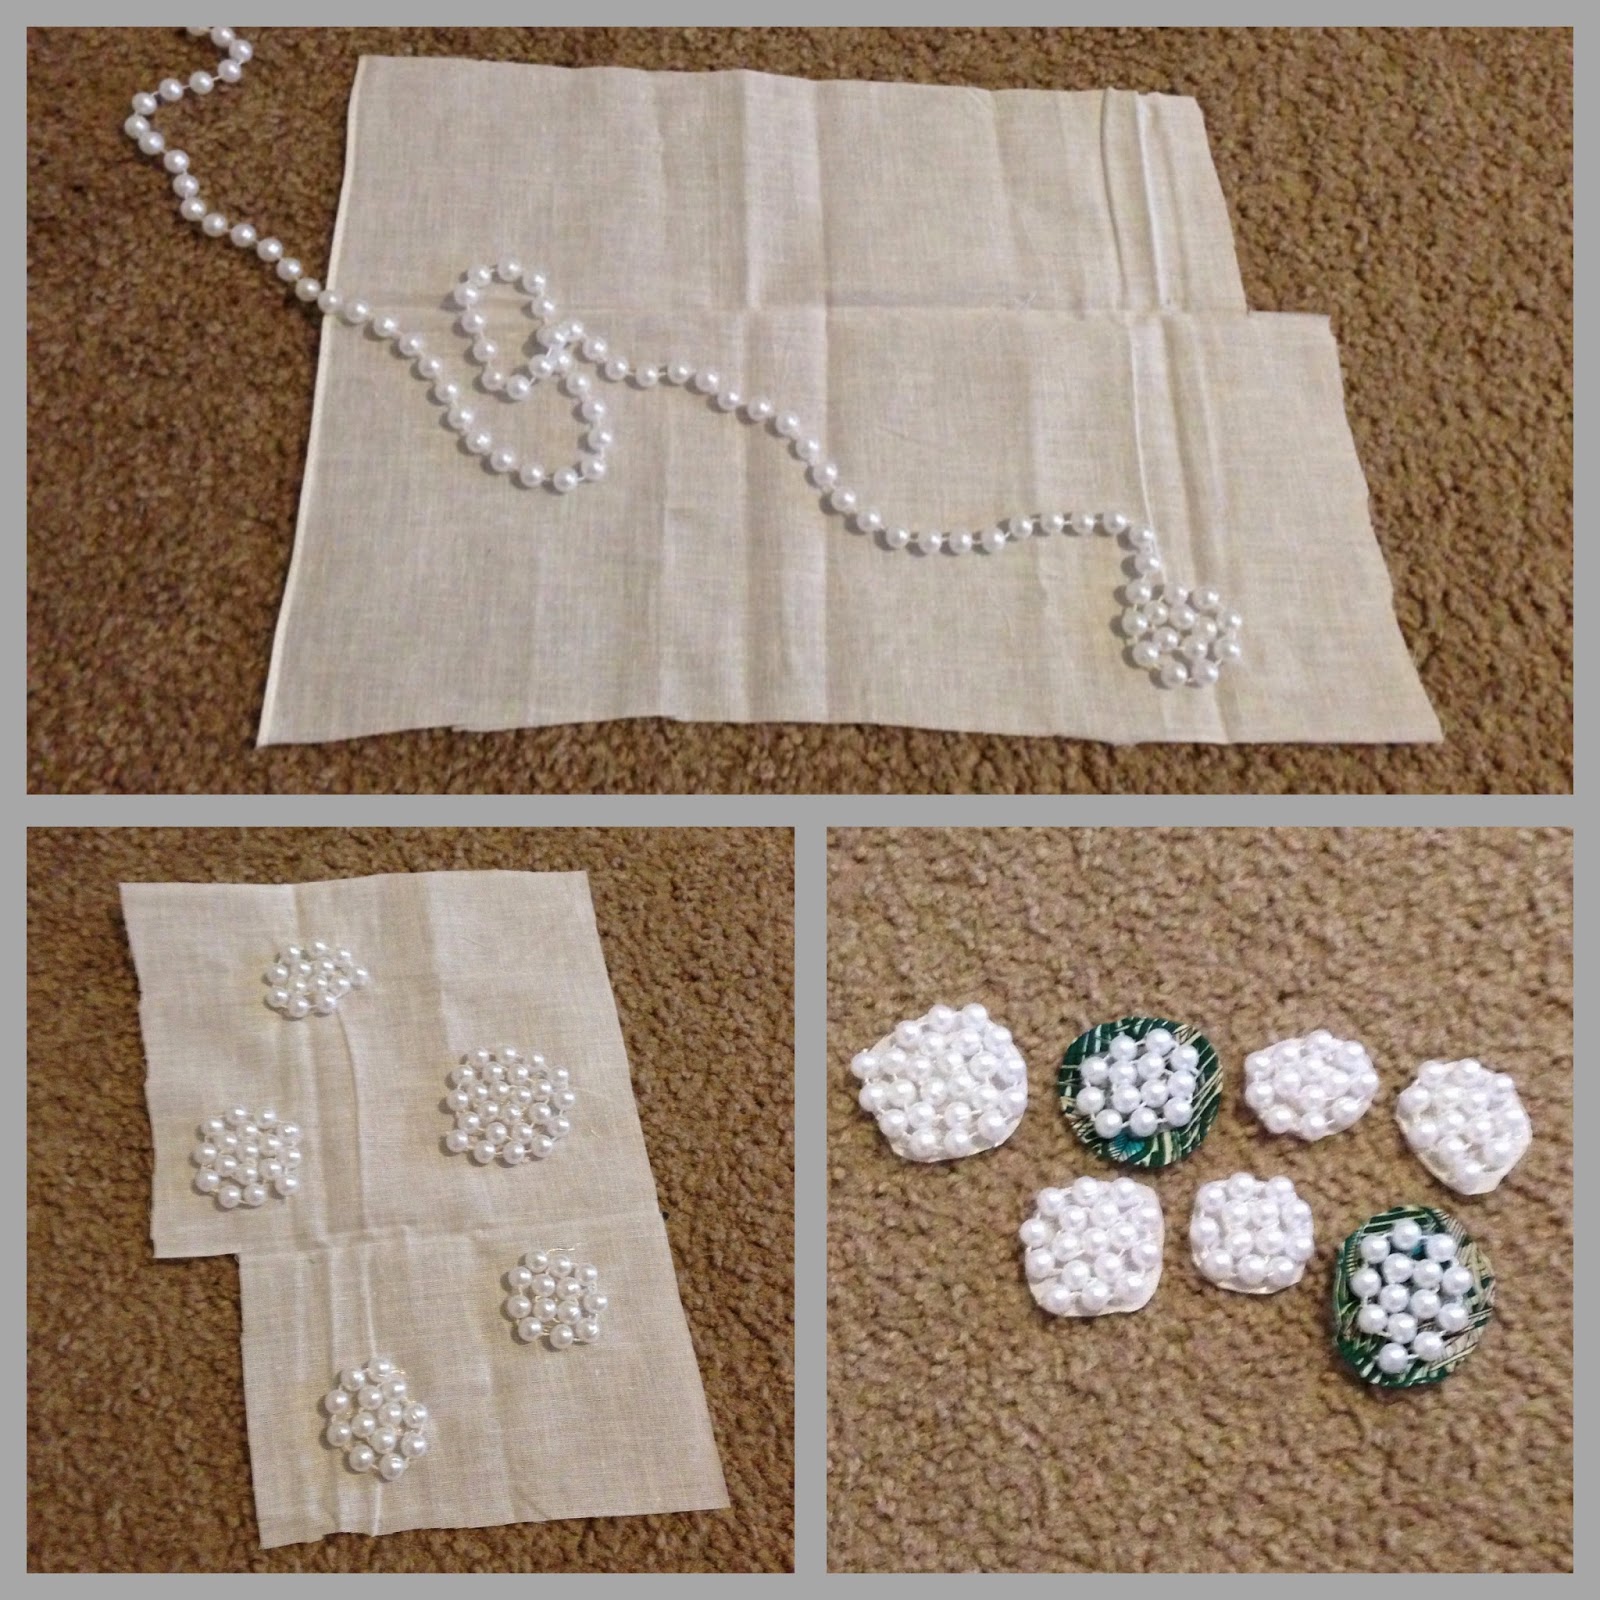
b. Wind the string of pearls into small circles on your fabric. Glue down the pearls once you have the size of circle you want. I made a few of these.
c. Cut the pearl circles out of your cloth. I cut on the edge of the circle for the ones on my white cloth but left a border on my peacock ones since I wanted the pattern to show.
d. Glue the pearl circles into any arrangement on your headband from step A. And there you have it!

You can skip step A and just glue these to an existing headband. Which brings me to...

Tutorial #4.
I love letters! I think getting a letter in the mail is one of the best things EVER. I have one friend from college who still writes. Dominique and I don't write much nowadays, but I'll send out a letter every few months and she'll send me a card every now and then. Instead of just a card for her birthday, I decided to also include this headband (and some other gifties...none that I made, though, so who cares what they are? LOL).

Re-purposed headband tutorial:
      Materials needed - old headband, a flower adornment, cloth, felt, scissors and hot glue. I wanted to use the rest of my peacock patterned cloth. I thought it would be a good idea to use some in each headband to tie them all together as one themed project.

a. Get an old headband you no longer use...or one that you do still use but want to spruce up before the next time you wear it. Measure the felt the exact length of the headband (minus the elastic part) and hot glue it onto the headband.
b. Draw leaves onto the cloth and cut out. I did 10 leaves. I freehanded mine but if I had to do it over again, I would have found a pattern or drawn them out first. I wasted a lot of cloth on the ones I messed up and I couldn't quite get them all the same size.
c. Arrange the leaves into the pattern that you want, then remove and hot glue them on (hoping that you had memorized the pattern. Haha!) Then glue the flower to the center of your leaf cluster. Voila!


Monday, February 16, 2015

Erica is making headbands!! (pt.1)

Headbands are cute, trendy and surprisingly easy to make. I had most of the materials already at home so that makes them a very cost effective craft, too. I'm doing a few so no back story tonight. Just crafts!!

Tutorial #1. Cloth flower headband
I'm making these for Elizabeth and Rachel (for our department Valentine's Day)
      my former craft night pal (she has a birthday coming up)
           and for my friend, Emma (for a one year wedding anniversary care package). Wes and I went to Sydney last year for my cousin Kent and his wife, Emma's, wedding. They were the absolute best hosts--showed us all that Sydney had to offer-- so we decided to send them an Oklahoma care package for their one year anniversary in May.

Materials needed:
Cloth- mine is an old romper-, elastic (not necessary to arrange into an 'E.' Haha!), ruler, scissors, hot glue gun, tacks and a sewing machine- unless you want to sew by hand, which is totally okay.

1) Cut the elastic into a 7 inch piece. Cut the cloth into a strip 15 inches long and 2 inches wide. Bigger or smaller depending on the size of the head you're making this for.
2) Fold the cloth in half length wise and sew together.
          Tip: I hate ironing with every fiber of my being so I would not tell you to do this unless its absolutely necessary... my cloth was really wrinkly so I ironed it before I started sewing. It made everything much neater and easier to measure & sew straight lines.
3) Sew the ends of the cloth to the ends of the elastic. Now you have a headband!
4) That's super cute and you could leave it as is... but I think I'll add cloth flowers to mine.
     a. cut 4 small squares of cloth;
     b. pinch the cloth from the center and scrunch up each piece into what you imagine would look like a petal;
     c. one at a time, hot glue the petal shaped pieces together.  Glue the pieces together at the base (where my finger is pinching). I used the glue to help arrange my petals into a flower formation after all four of the base pieces were glued together;
     d. take your push pin and pin in the center; I put a dab of hot glue on the pointy end of the pin after I pushed it through the flower (so no one gets poked in the head!).
5) Hot glue your flower(s) to the headband.

Tutorial #2. Braids and ribbon/lace headband


I'm keeping this one for myself. I love the look of braids and I want to learn how to braid my hair a thousand different ways. This cloth is from a romper I got in Hong Kong. I bought it before they became popular, I swear! LOL Sadly, it never really fit me right so I cut off the top half to use for crafting (for this one and the headbands above). I still wear the bottom half as pants.
Materials needed - cloth, lace or ribbon, elastic, scissors, hot glue gun and ruler

1) Cut your elastic to about 9 inches (more or less, of course, depending on your size of head).
2) Cut your ribbon to about 12 inches. I get headaches easily so I don't like my headbands too tight. Also, the ribbon doesn't stretch so you have to make it longer than your elastic so it'll stretch along with it. I'm using two pieces of ribbon for this. You can use as much or little as you'd like.
3) Now for the fun part... braiding! I'm going to try to teach you how to braid, if you don't already know how. I was never really taught to braid (I think I just played with my hair long enough until I figured it out. LOL) so I'm not sure how well this will go...
     a. cut your cloth into 3 slender and even 14 inch strips. It seems like a lot but things shrink when they're braided. I didn't measure mine perfectly but they were mostly the same length and width.
     b. firmly place the ends of cloth on the edge of a surface. I would have loved to have another human holding it for me but my craft night buddy now resides in Texas : ( I had to settle for tape and a paperweight.
     c. cross piece A over piece B
         now piece A should be next to piece C
         cross piece C over piece A
         now B should be your first piece, C should be your second and A should be your third piece.
     d. continue to cross your first piece over the second piece and then the third piece also over the second piece. Try to keep your pieces of cloth from twisting and braid them as tightly as you can. I made a total of three braids.
4) When I finished each braid, I didn't tie or tape any of the ends. I just untaped them from my surface and left them loose until I was done with all three of them.  They shouldn't fall apart. I then braided the three single braids together into a large thick braid. I hot glued the ends of the large thick braid together.
5) Hot glue your large thick braid to the elastic. Then hot glue a piece of ribbon on each side of it.

I have a couple of more ideas for headbands (and more material lying around) but I think I'll save those for next week. Its getting too close to my dinner time and I'm hungry! 


Monday, October 20, 2014

Last year for Halloween...Erica was a cupcake!!

Its that time again... costume parties a plenty. What are YOU going to be for Halloween? Last year, I was a cupcake and Wes was a baker.

 
Yup, we were adorable. We made it to two Halloween parties and I got to strut my cupcake-ness all night long. Once again, this tutorial would have been awesome if I took step-by-step pictures but I didn't know at the time that I'd need the aforementioned pictures. So, here's the best I could do. (Just a tad bit of advice...this project should be done over multiple hours with breaks or days in between and its best of have an assistant, boyfriend or craft night buddy to help because there's lots of "hey, can you hold one thing out of the way while I hot glue something else" involved.) 
 
Cupcake costume tutorial -
Materials needed: laundry basket, poster board (2 pieces or more...depending on how big your basket is), shoe laces (I used two sets), tulle (the mesh fabric, I bought a yard), cotton stuffing (one bag should do), embellishments, hot glue (A LOT of hot glue... so much so you'll develop a love hate relationship with it in the end), scissors, duct tape, a small bag (I used one of those little bags that you get when you buy jewelry from a craft fair or boutique)  
 
1. Purchase a laundry basket you can fit in. Cut the bottom out of the basket and tie the shoe laces on as if they were suspenders.
2. Cut your poster board into a few pieces and fold each piece accordion style. Since the basket is round, you can't use one piece all the way around. I cut a piece that folded into about 2 - 3 accordion folds and hot glued it on.  One piece at a time until the basket resembles the cup part of the cupcake.
3. If your poster board is not evenly shaped in the end, go around with scissors and trim the top and bottom. I found this easier than measuring each piece to make sure they were the same size.
4. Hot glue is amazing but it doesn't hold everything. Duct tape the poster board to the inside of your laundry basket to make sure none falls off. This would be another good time to have a buddy help you hold everything in place while you go around with duct tape... not necessary but it does make it easier.
 
After steps 1-4, you should look like half of a cupcake. This would be a good time to take a break and find your assistant. You'll need him or her for the next few steps.
 

5. Cut the tulle into 4 - 6 pieces. Glue the edge of each piece onto the top of the laundry basket.
6. Open the bag of cotton stuffing and tear apart the stuffing and fluff it up so its not one large bundle.  This is where it becomes a two person job...
7. Hold some cotton stuffing on the edge of your laundry basket, fold the tulle over and hot glue.  Do this all around your laundry basket. I used soooo much hot glue and burned every single one of my poor little fingers but was successful in the end.  Don't despair!!
8. After hot gluing all the cotton stuffing into the tulle and onto the laundry basket, I went around a second time and glued all the loose pieces to each other or onto the laundry basket. This would be another good time to have a buddy help you hold everything in place while you go around with extra glue.

After steps 5-8, I became a cupcake!!

 
 9. Lastly, is the fun stuff. Embellish that cupcake!  Give yourself some sprinkles, some jazz and pizazz. LOL I used stick-on gems on the accordion folds of my poster board and little cupcake and baked good stickers all over the tulle. I wanted to add glitter as sprinkles but figured that would be way too messy. 
10.  Tie your little jewelry bag inside your laundry basket. Then you can be a partying cupcake without a purse or clutch and still have your lip stick, keys, etc.
 
 
Here is the finished project.  I went to one of my good friend's epic Halloween party and took third in the costume party. Here's me graciously accepting my ribbon.  Another costume to come next week. See you guys then : )

Monday, October 13, 2014

Erica LOVES earrings!

I knew I had to organize and rearrange my earrings for this blog's pictures. What I didn't know is that I'd get carried away and organize all of my accessories... necklaces, bracelets and hair accessories were done along with the earrings. I love living with my mate but there's something therapeutic about having the apartment to yourself and cleaning with loud music on. I'm so productive!! Here is what my earrings ended up looking like. All nice and in line. I had more but I got rid of a ton of stuff I don't wear anymore.


Funny story about this thing.  I knew I had way too many earrings and throwing them in a box would not work.  I couldn't see them all and they were getting tangled : ( I had an idea in my head and I was fairly certain I've seen this "aluminum sheet of thing with holes" at a hardware store before.  So I head to Home Depot and find the first stocker walking the aisles.  "Sir," I said politely as I approached, "I have an idea of how to organize my earrings. I need a sheet of something I can hang that's about the size of your standard poster. I need it to have holes punched in it.  I need the holes to be spaced evenly so I can stick all my pairs of earrings on this thing and hang it in my closet. Can you direct me to something like that?" And surprisingly, he took me right to this thing. I guess he's been asked before. Crafty girls must come to Home Depot a lot.

It works great on my dangly earrings but what about the studs? How about something like this?


I got this idea off  Pinterest and here's my take on it...
     Picture frame & Ribbon earring holder tutorial -
     Materials needed: picture frame (any size will work, I went with the standard 4"x6"), 2 types of ribbon, scissors & hot glue

1. Take the backing and glass out of your picture frame.  Save it for another craft! : )
2. Start on one corner and tie your vertical ribbon (the piece that's not lacy in my picture) into a knot behind the frame.
3. Wrap about a couple of times up and down the picture frame. Hot glue the end piece to the back of the frame.
4. Then tie the horizontal piece of ribbon. I tied mine into a bow because I couldn't cleverly disguise the knot anywhere on the frame.
5. Pull across the frame, cut and hot glue. Repeat until you have enough rows for your earrings.
6. Glue a piece of ribbon on the top right and left corners to hang.
7. Let hot glue completely dry and make sure the frame is cool before putting earrings in.

Easy peasy. Thanks for spending your Monday with me!!