Showing posts with label arts n' crafts. Show all posts

Monday, October 12, 2020

Erica and her sewing club make windsocks.

Along with presenting my pretty bohemian windsock tutorial, this is also an excuse to show off my crocheted dress.

It's been so long since I posted anything (although I have been sewing and crocheting like crazy... just not any DIY'ing or crafting) that I don't really remember how to. Let's see... write some boring backstory, write an instructional tutorial, add some pictures. Ok, here goes - 

I am a proud and happy member of American Sewing Guild. I have been for the past three years. It's a great group. Everyone is super friendly, knowledgeable and generous. Earlier this year, our sewing club chapter president, Kim, told us that if we wanted to present/lead a DIY class for one of our meetings, we would receive $10 in "ASG Bucks". These can be used toward our annual retreat (ok, cool πŸ˜€), ASG merchandise (nah πŸ˜’) and to buy stuff at our fabric swap/garage sales (YEEESSSSS!!! πŸ˜πŸ˜ƒπŸ˜). We all know how much I love buying fabric and sewing notions... I NEEDED those ASG Bucks. LOL Anyway, the only rules were that the project had to be relatively simple, can be completed in under an hour and fairly cheap (since the sewing club provides all the supplies needed). One of my favorite things is finding and doing fun & easy craft projects. I knew I had to sign up to lead a meeting even though I have never taught anything in my entire life and I have zero patience for humans. The meeting was last week and it went surprisingly well (beginner's luck, maybe). We made windsocks using embroidery hoops, fabric strips and ribbon. Everyone finished their project and had a lovely time. Here are the instructions.

DIY Windsock:

Kim bought the embroidery hoops and fabric with our ASG dues but all the ribbon came from the garage sale!! All.of.it. Now you see how amazing our garage sales are and why I need those ASG Bucks. LOL

Supplies needed: embroidery hoop (any size will do), 3 pieces of equal length string, 2-inch wide fabric strips (the length can be cut to your preference), scissors (Kim suggested using scrapbooking scissors or pinking shears to cut designs into the fabric strips), ribbon, lace, other decorative material, glue (optional)


1. Open the embroidery hoop and set the outside piece (the piece with the screw and fastener) aside. 

2. Tie the three pieces of string to the inside of the embroidery hoop to form a triangle. Gather the pieces of string together and tie them into a knotted loop at the top. This will be for hanging up the finished windsock.

3. Drape the fabric strips around the inside of the embroidery hoop. This is easier to do if the hoop is hanging from somthing (or a friend is holding it for you). If you're worried about the fabric strips moving out of place, put a dab of glue on it to stick it to the embroidery hoop.

4. Add ribbon, lace or any other decorative material over the fabric strips. Go crazy with color, patterns and texture! Kim suggest stringing beads or bells to the end of the pieces.

5. Once everything is draped in place, put the outside of the embroidery hoop back on (again, easier to do if you have a friend holding it for you). This will hold all of the fabric strips, ribbon, lace, etc. in place. Fastener it on tightly.

And we're done!! Hang it outside (or inside) and enjoy!! So pretty, right? 


Monday, July 6, 2020

Erica & friends make bowls out of buttons.


**EDIT** - In this weird time of covid-19, we did not meet in person to complete this project. The project was started in February before the quarantine began. We got to the part where we glued buttons all over the balloon and Courtney worked on the project some (since we left everything at her house and she's super generous with her time) and sent me pictures for this blog post. I picked up the semi-finished project from her porch--contactless!--and finished up the rest at home.  


I’m so excited because I haven't posted a DIY tutorial (or any sort of blog, really) in ages and I’m finally getting to now! I'm part of a semi-regular craft night with three other women (Courtney--one of my really good friends and mother & wife extraordinaire, Jessa--who is always so generous in providing our art supplies, and Rachelle--owner of the wildly successful international yarn brand, Moon Drake). Our last project was to make a bowl from glue and buttons. They turned out really nice. πŸ˜„ Mine is currently in my sewing room. Just a warning: this project takes forever to complete due to having to wait for layer upon layers of glue to dry, so don’t start it if you’re short on time. LOL

The ladies crafting in Courtney's kitchen.

DIY Button Bowl:
SUPPLIES – buttons, balloon, Sharpee (or another brand) marker, paint brush, glue (we used Elmer’s), mod podge, plastic cup, water resistant coating.


1.   Inflate balloon; the top of the balloon will be the size of the bowl.

2.   Set the balloon on top of a plastic cup for balance. It will remain here for the duration of this project. So use a cup you won’t be needing for the foreseeable future. LOL

3.   Use a permanent marker to outline the size/shape of the bowl onto the balloon.

4.   Brush Elmer’s glue onto the bowl portion of the balloon. 
      We used three coats of clue and left the balloon alone to dry over night. I think each layer took 1 – 2 hours to dry but I wasn’t really timing it. While we were waiting for the glue to dry, Courtney and I ate dinner πŸ²πŸ˜‹πŸ₯˜and painted our fingernails. πŸ’…

5.   Using Elmer’s glue, adhere buttons over the dried glue. 
     *Glue the buttons above the Sharpee line. 
     *Glue a large button in the top center so the bowl will balance once its taken off the balloon. 
The buttons should be spaced pretty close together but don’t worry if there is empty space in between. The mod podge will fill all of that in. We left our balloons alone and let them dry over night. 
While not necessary, Jessa & I covered our balloons with plastic wrap so the buttons wouldn’t get disturbed.

6.   Brush mod podge over the buttons and let dry over night.

7.   Take the balloon off the cup and pop it (cut the knot from the bottom of the balloon and carefully let the air out). Slowly peel the balloon off the button bowl. This is when I picked up my semi-finished bowl from Courtney's porch. I decided last minute to paint the inside of the bowl red to match the buttons.

8.   Brush water resistant coating onto the inside and outside of the bowl. Let dry.

And we’re finally done!! The project itself is pretty easy. It just took forever to dry. I’m curious to make other bowls from different small objects…like beads or confetti or jewelry/charms. So many things to experiment with!! Another quarantine project!!

Monday, June 11, 2018

Erica attends a sewing retreat


I have officially been a member of the Oklahoma chapter of the American Sewing Guild for one full year. The guild is made up of around fifty kind & wonderful women who have taken me in as one of their own (even though my attendance record for meetings is awful and my sewing skill level is a little shaky). Each year, the guild holds a three-day sewing retreat at Canyon Camp in Hinton, OK. I was interested in participating but wasn't sure if an all-weekend retreat was right for me. My friend, Brenda, encouraged me to ask if it was possible for me to register for just a day. Jane, the former President of the Oklahoma chapter and chairwoman for the retreat, made an exception for me to only attend Friday's session. Attending retreat for one day meant twelve hours of non-stop sewing (9am - 9pm). I decided to pack ambitiously and brought three projects to work on. At the end of the evening, I had only finished one of the three! As mentioned above, my sewing skills are a little shaky. LOL

Note the picture of my rugged Subaru in the outdoors. LOL

Canyon Camp is a beautiful campsite for the United Methodist Church. We were housed in the conference center which was about a quarter of a mile away from the cafeteria. (There were many other buildings and cabins but I wasn't allowed to explore too much on my own. The only downside of being the youngest member attending a retreat with fifty-two older women is that I had fifty-two "moms" looking after me.) Jane was waiting for me when I arrived -- I was late, no surprise -- she greeted me wholeheartedly with a "There she is! Erica!!" and goodie bag. The goodie bag was a handmade lunch bag filled with treats and supplies for the weekend. The Sewing Retreat Board has spent all year preparing (aka hand-making) these for us. I was lead into the main conference room to set up my sewing station and then to the kitchen for snacks. Wes made a pecan pie from scratch for me to bring to share. All the women were impressed that my husband bakes. I was placed at the end of a long table across from Brenda and her friend Karen (I think that was her name. I'm terrible!)
Top: Our sewing room. I sat in the back corner (not pictured). 
Bottom: Wes's beautiful and delicious pie amidst all the other snacks.  

When I started teaching myself to sew a couple of years ago, I noticed that everyone was 1. very eager to help me learn and give me tips & tricks and 2. astonished that a "young person" has taken an interest in sewing. The ladies of American Sewing Guild were no different. A week before the retreat, Jane emailed me a pattern of a stuffed animal (sloth) that she thought I should make during the retreat. I brought all of the supplies and decided to start on that project first. Jane came over to my station to help me get settled and started on the project. Throughout the remainder of the morning, it felt like almost everyone came up to me to check on me and ask what I was working on. This is a very close knit and social bunch so it wasn't that much of a surprise but I think a majority of the attention was fixed on me; maybe because this was my first time attending retreat and they wanted me to feel extra welcome. I enjoyed the attention and making friends but with all the chatting, I barely got anything done. Brenda later told me that the retreat is more for socializing than for sewing. I am very slow when it comes to sewing projects and this sloth project was no different. I spent the entire morning tracing and cutting my pattern and then it was lunchtime. Where did the time go!?!

We enjoyed a nice trek to the cafeteria for lunch (baked potatoes, chili and salad bar with an apple tart for dessert).  After lunch, we had our first workshop. Another woman named Brenda taught us how to make a matching coin purse and pin cushion set. I was doing great until my sewing machine broke. Oh no!!!!!! This is the same sewing machine that was giving me trouble during my sewing course at Frances Tuttle a few months ago. I thought I had fixed it and it was working fine in the morning but it was not cooperating this afternoon. The machine was not picking up the bobbin thread, instead it was forming "birds nest" knots with my thread. Luckily, I was surrounded by sewing machine pros and everyone came around to have a look. My friend, Brenda, Susan and LuElla each spent around 10 - 30 minutes sitting with my machine trying to fix it. After that, I spent another forty-five minutes or so trying to diagnose and fix the issue via help from the Internet. I followed every troubleshooting tip but had no luck. I was afraid that I would have to end my day early but Brenda (my sewing machine savior) lent me her machine to use for the remainder of the day. She claimed that she had a lot of tracing and cutting to do and wouldn't be needing it. I think she saw me about to burst into tears of frustration and swooped in to save the day.  I owe this woman so much.
Along with lending me her super easy to use digital sewing machine (I want one of these SO BAD!!), Brenda gave me a private lesson on the coin purse and pin cushion. Our teacher, the other Brenda, had completed the workshop and was busy with projects of her own by that time. I missed out on a majority of the workshop but Brenda had previously made the project before so she had no problem guiding me. The afternoon flew by and then it was dinner time before I knew it (I was still not done sewing my sloth).  We made another walk to the cafeteria for dinner (chicken tacos, Mexican rice, refried beans and a salad bar with a lemon bar for dessert). I ate quickly and returned to my sloth. I was determined to at least finish one of the projects I had brought. The project called for adhering fabric with fusible web. I had never used this before but the instructions seemed fairly straight forward so I started without asking for help. Little did I know, you need to use a press cloth when ironing on the fusible web. So, dumb little me ruined Jane's ironing board cover. I felt so awful because 1. Jane had already done so much for me, 2. she handmade that ironing board cover (read: irreplaceable), 3. it was a shared ironing board so I ruined it for all the other women who needed to iron and 4. I didn't know how to get off the ironed on sticky mess that I had made. After confessing to Jane, I went to Marilyn for help (she's previously invited me over to her house and given me fabric so I felt pretty close to her as a ally). She told me not to worry, the mess would wash out but in the meantime, we could turn the cover inside-out. The second time someone had to save the day for me. After regrouping from my mini panic attack, I finished my stuffed sloth and showed it off to all my new friends. By that time, it was getting dark and it was time for me to leave.
All I have to show for after a full day of sewing - one stuffed animal, one pin cushion and one coin purse.

I had a wonderful time at the annual sewing retreat (even with the aforementioned hiccups). I learned a ton and met many new friends. Each and every woman in attendance was extremely kind and welcoming. They invited me to sit with them during mealtimes, showered me with encouragement and constructive criticism and showed me their finished projects and asked for my approval (like I had any idea what I was doing. LOL) At times I felt like a burden with my many requests for help and faulty sewing machine but that was just my lack of confidence creeping in. They never did anything to lead me to feel inferior. I'm not sure if Jane will invite me back after ruining her ironing board cover but I will be happy to return to 2019's retreat if they'll have me.

Monday, October 16, 2017

Erica and Lacey make cosmetics pouches.

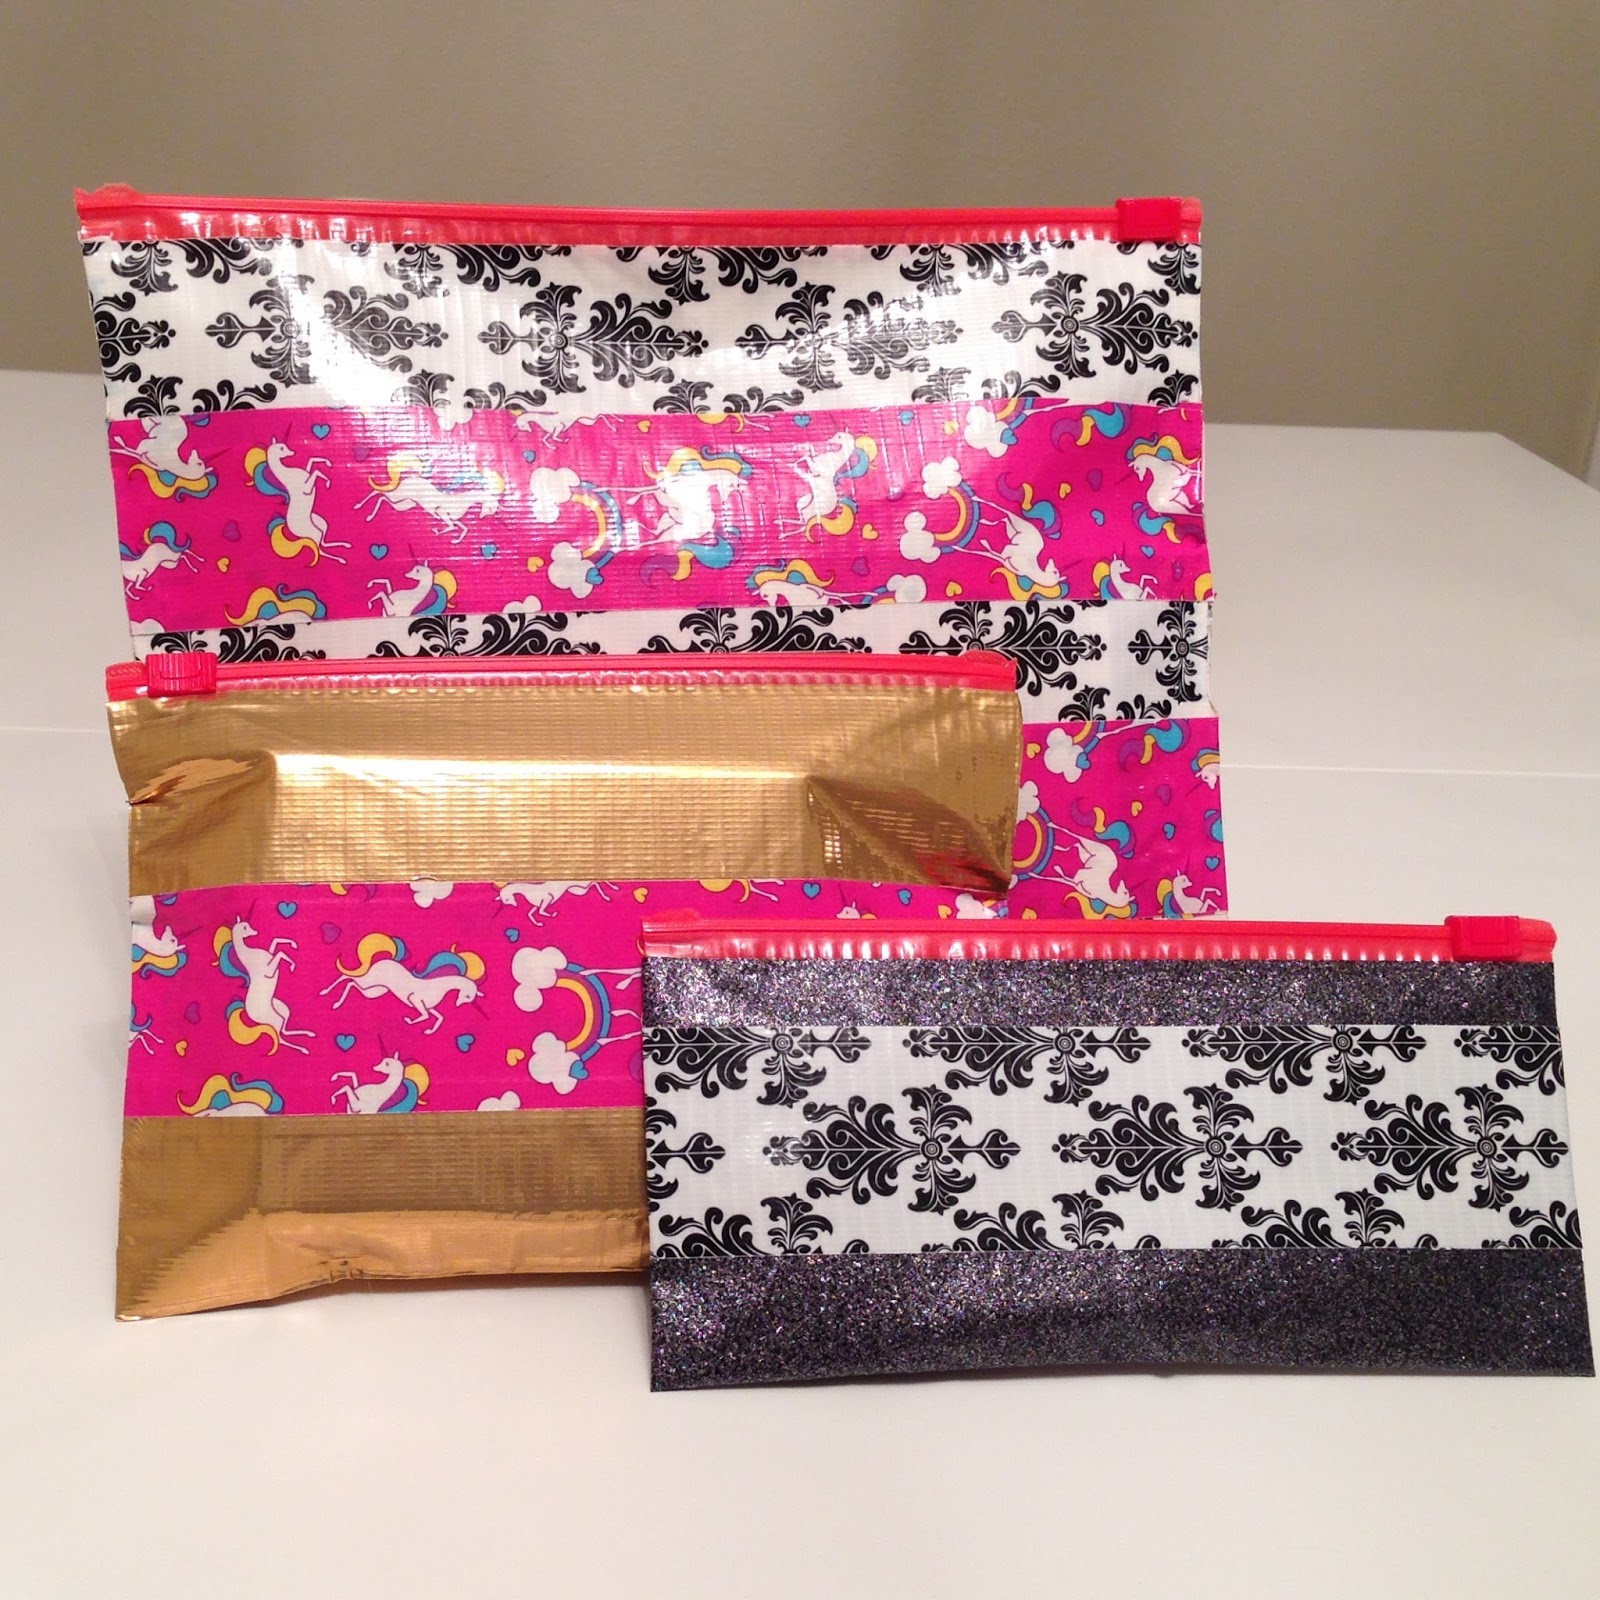
Can you believe these are made of plastic sandwich bags and Duct tape? They're so cute! 

Yay, a DIY blog! Monday Craft Night is back. Sorry it has been a while (craft shows have taken priority this month). A couple of weeks ago, I came across one of those "Duct tape hack" videos on Facebook. I normally don't find those videos very inspiring (and most of the time, the "hack" takes more time to perform than the problem its trying to solve... just buy a bathroom rug or fix a leak the old fashioned way!) But, the project in this video was simple and the supplies were cheap. I invited Lacey over and we recreated the project.
I saw this majestic unicorn Duct tape and knew that I needed it in my life! 

The cosmetics pouches turned out to be so friggin' adorable! Duct tape comes in so many printed designs (did you know that it is also now stickier than ever? The packaging proclaimed that the adhesive formula is stronger. Too sticky in my opinion.) and sandwich bags come in so many different sizes. The sky is the limit with this DIY project. The pouches don't have to just be for cosmetics, either. My craft supplies box was a mess so I'm using mine for organizing craft supplies instead.

DIY Cosmetic Pouch Tutorial-
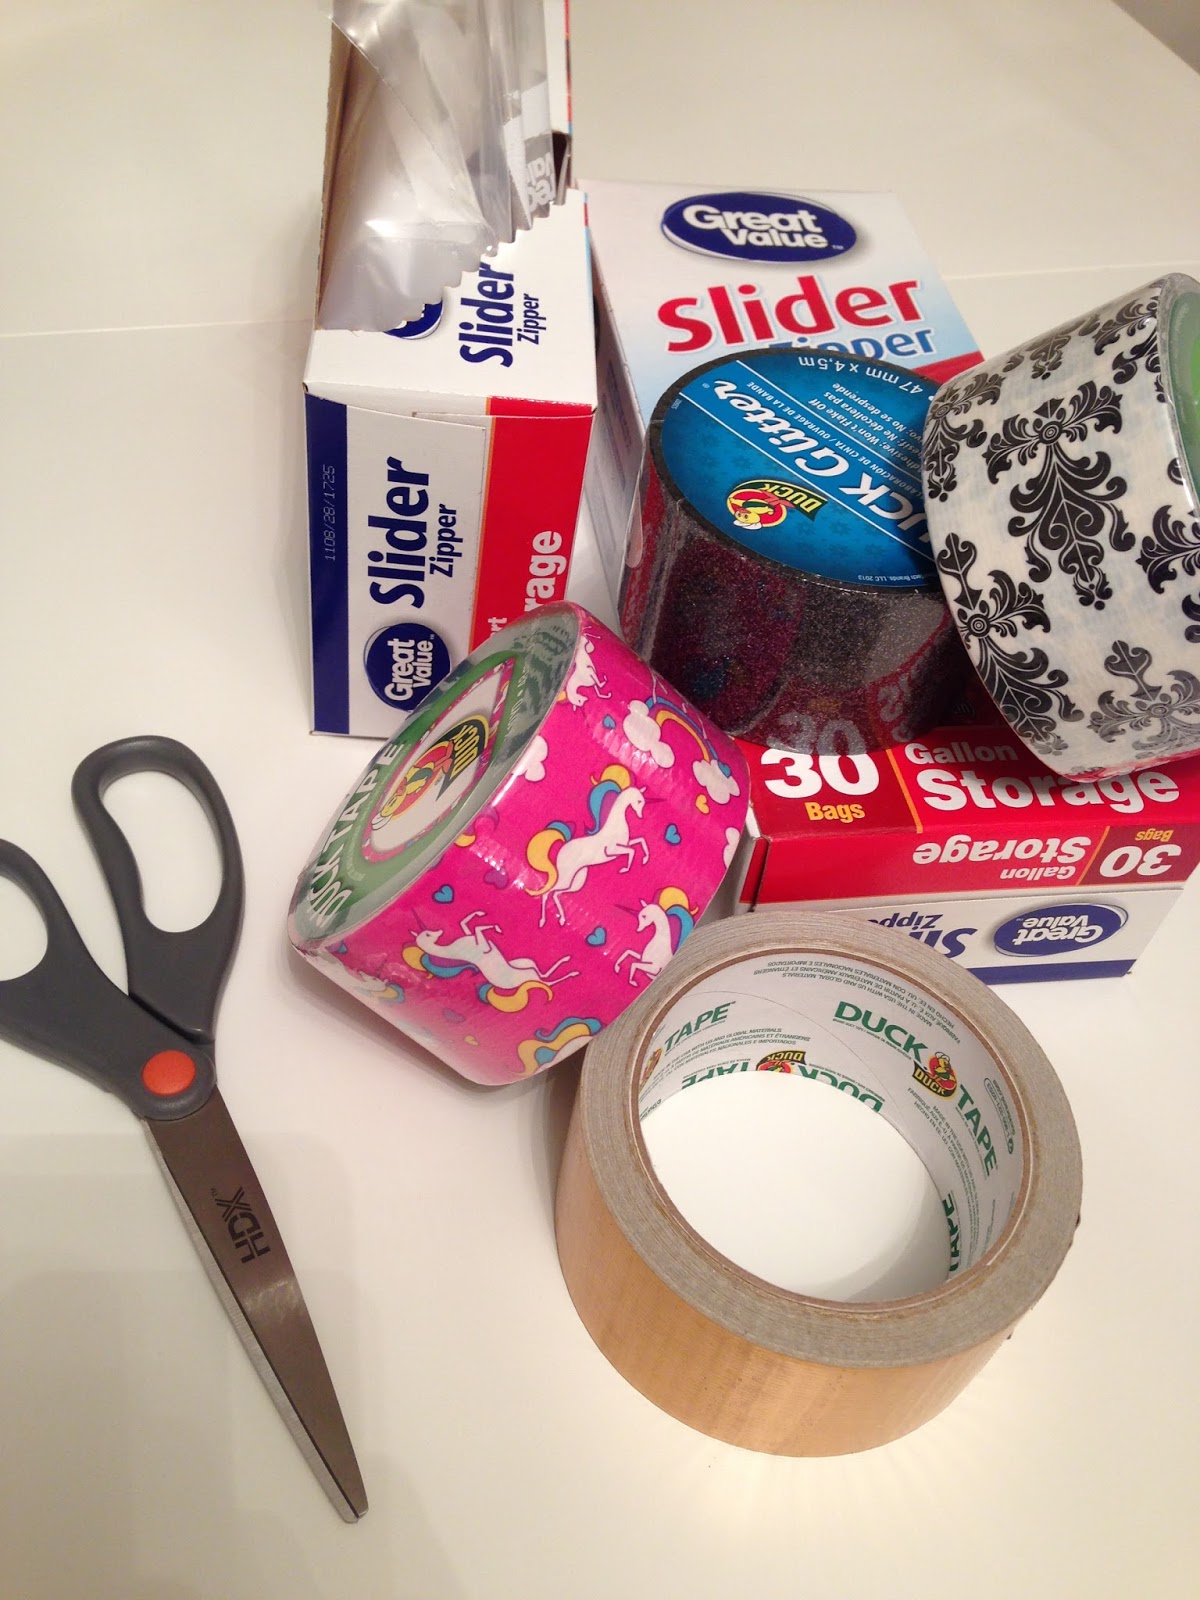
Materials needed: Duct tape, sliding zipper plastic sandwich bags, scissors

1. Decide what you want to put in the finished pouch. Using that as a guide, measure how big you want the pouch to be.

2. If you want the pouch to be smaller than the original size of the sandwich bag, fold it to the new desired size and tape it in place. 

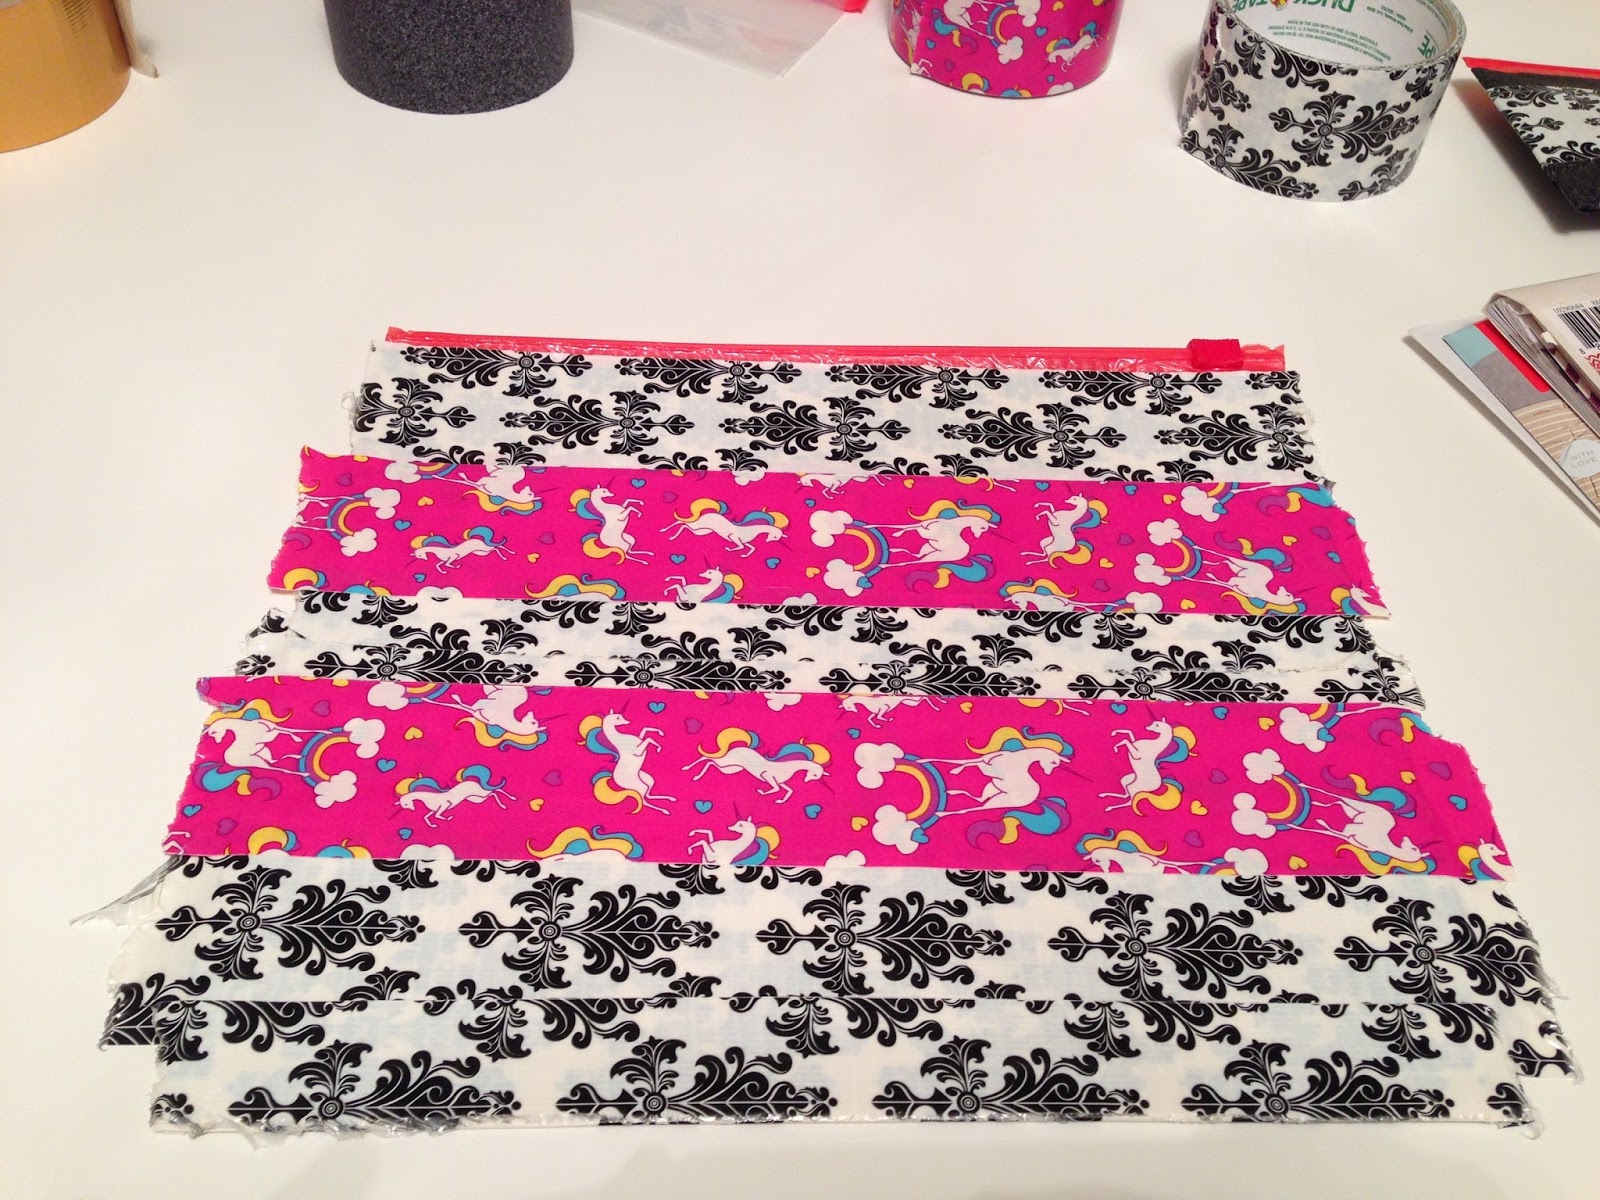
3. Cover the sandwich bag in Duct tape. Make sure to tape both front and back sides of the sandwich bag. Although the Duct tape was super sticky, I still found it fairly easy to tear pieces off of the sandwich bag if I accidentally placed it in the wrong position. To avoid air bubbles, I found it best to place the Duct tape on one end of the sandwich bag and slowly press it down, moving from one end to another, instead of placing the entire piece of tape on the sandwich bag at once. Also, be cautious of the zipper at the top of the sandwich bag. I stopped taping just underneath the red zipper. 

4. Repeat step #3 so there are two layers of Duct tape over the sandwich bag. (You can probably do multiple layers depending on what you plan to store in the finished pouch and how hefty you want it to be but I stuck with two layers.) 

5. For the first layer of Duct tape, I folded the edges of the Duct tape over (as shown in the picture above step #3). For the second layer of Duct tape, I left the edges hanging over. Once you're completely finished taping, cut all the extra tape off the edges of the sandwich bag. 
Athena enjoys crafting with us!

All done! In about 15 minutes, $10 worth of supplies and five easy steps, you've got a nice collection of matching pouches.


Monday, February 13, 2017

Erica & Lacey Learn Paper Quilling


What is paper quilling, you ask? And why would Lacey and I go to a class to learn it?
       Paper quilling is an art form where you roll thin strips of paper into coils & scrolls and then position the rolled paper pieces to form patterns, shapes and designs. The art is traceable to the 15th century and became popular in the 18th century. It was a fashionable hobby for the young women at the time. Lacey & I are fashionable young women, so we naturally gravitated toward taking a class on the art form. (Note: I actually am neither young nor fashionable, but I do love art and trying new things. The classes were free at the Metropolitan Library and I also knew the teacher.)
The top right snowflake pendant is a piece that our teacher made.

At a craft show last November, my booth was next to an artist who sold beautiful pendants and ornaments ... made from paper!! I was blown away by the fact that everything in her booth was made from paper and that she handmade each piece. The artist was Toni Swayze. She has been making paper art for over a decade and is a member of both the North American Quilling Guild and the Quilling Guild based in the United Kingdom. We talked throughout the day and she informed me that she teaches for the Metropolitan Library System. We exchanged contact information and she promised to enroll me in her next class.

Fast forward a few months and Lacey & I find ourselves in Paper Quilling for Beginners. Toni started class with a brief history lesson and showed us some examples of her finished artwork. We then learned about our quilling tools. Our main tool was a metal pick with a slot across the head. The object was to slide the end of a strip of paper into the slot and coil the paper into a small tight spiral. We made several of these spirals for practice. Once we got the hang of it, we moved onto other rolled shapes. Toni provided us with a chart of basic shapes. We made tear drops, squares and hearts. After we finished making all the simple shapes, our "assignment" was to design a flower. The pattern was a little hard to follow so I made my own flowers. Since we mastered the basic techniques in the beginners class, Toni invited us back for her advanced class a week later.
Mine are the two flowers on the bottom left and Lacey's is the one to the right. She was much better a following the flower pattern.
There were five students in the beginners' class. Only three of us returned for the advanced class. The advanced class was certainly advanced. We were all given a new quilling chart with much more complicated patterns. I don't think my technique would have granted me access to the advanced class but I knew the teacher (yay for connections, right?) and Lacey was an expert quiller. The shapes we made in the advanced class used multiple strips of paper. My favorite were the beehive (below, purple) and royal flower (below, yellow). For these two shapes, we started by rolling a large tear drop shape. We then rolled another strip of paper into small spirals and then put the spiraled paper into the large tear drop.
Mine's on the left and Lacey's is on the right.

Since this was the advanced class, Toni assumed everyone was familiar with the techniques and we moved through the chart fairly quickly. I would have preferred a more thorough demonstration, as I needed some one-on-one assistance on a few of the shapes. Since it was a small class, we finished a little early and Toni was able to spend some time working at mine and Lacey's table toward the end of class. I really struggled with the Malaysian shape, which is a spiraled tear drop curled into another tear drop. Lacey's is the perfect blue one in the picture above. My first attempt was awful so Toni gave me more paper for a second attempt. Sadly, it did not turn out much better. LOL She also showed us examples of her work that incorporated the shapes we were learning. That woman makes some amazing flowers and butterflies!

I enjoyed paper quilling and I think it was fun to learn but I do not believe I will be adding it to my collection of hobbies. It proved to be a very involved and time consuming task. It took me forever to finish the simple projects we made in class (I can't imagine how long it takes for more complicated designs!) The advanced patterns demanded too much precision. After making a handful of coils and scrolls--and most of them oddly misshapen-- the task became less fun and more tedious. I just do not have enough patience for it. Which is why I am glad people like Toni go to craft shows... if I ever need a beautiful paper pendant, I know who to buy from!
Toni generously provided us each supplies and instructions for a project to complete at home. 

Monday, October 17, 2016

Wes & Erica spend a weekend at the fair, part 2.

To get us in the mood for Halloween, here are my favorite pumpkins from the 4H competition: the hollowed out purple monster on the top left, the box of donuts on the top right, the ice cream cone on the bottom left and the root beer on the bottom right.

I'm back with more fair fun and pictures! As I mentioned last week, Wes & I spent a majority of the afternoon indoors instead of outside. One building that was particularly interesting was the creative arts building (aka the 4H building). I'm not sure what 4H is but I don't think it's necessarily very artistic. I suppose a lot of the children's offerings were creative, though. It was more like very advanced home economics. My public-school education didn't offer 4H but if it did, I would have probably both participated and excelled in it. It was a bunch of kids' cooking projects, home grown vegetables and random display boards with whatever projects they wanted to display. I saw a project on how to clean a gun, how to properly express emotions through facial expressions (Wes claimed that mad and angry looked identical) and the joys of raising a litter of pit bull puppies. 
My dream is to be a middle-aged lady who brings sewing projects to the fair and has people complement me on my talent all day long. 

After thoroughly exploring the 4H building and poking fun at the children's projects, we decided to head back outside. (We weren't rude and none of the children were present. Plus, who doesn't laugh when they see an entire project dedicated on the many uses of rabbit poo?)
Bees and rabbits! 

Some other things we saw throughout the day were: a martial arts demonstration (it was more of a self defense demonstration), a pair of elderly ladies walking around in those novelty t-shirts that have a sexy beach body printed on them to make it seem as if the person wearing the t-shirt is sporting the body, and I sampled peach pineapple jelly (not very tasty).
Derek Shaw's martial arts demonstration.

Next on our agenda was the Swifty Swine Pig Races. Another thing I did not know existed. There were three races and each pig in the heat had a silly name like Ba-rack-o-ribs Obama and Brad Pig. The pigs ran around a little track and the winner was awarded an Oreo. The star of the show was Swifty, who was a swimming pig. They brought him out to a cheering audience. He took a dump, jumped into a trough of water, swam across and then ate an Oreo. It doesn't sound that exciting but it was actually rather fun to watch. 

As evening came, the fair offered some live music. 
The first performance was by a trio of drummers who call themselves Junk Rock. Their drum kits are made from buckets, old drum pieces and PVC pipe. It was really neat. One of their songs was a cover of the nostalgic, Wipe Out. They asked the audience to dance along and a lot of the elderly did! I wish I'll end up happy and carefree in my old age. One of the other songs the drummers covered was Taylor Swift's "Shake it Off." All of their other songs were originals.

The next set was an Elvis impersonation contest. Behind the Zoppe circus and fair food, this was my favorite part of the day. The competition was regional so we saw Elvises from all over the United States and we also saw Cody Ray Slaughter. He is a famous Elvis impersonator who has toured & performed live as "Elvis" and appeared late night television. He sang one song and was really impressive but for some reason, he didn't dress in costume. He just wore jeans and t-shirt. Maybe he got funnel cake on his Elvis costume. We saw 6 or 7 Elvis impersonators. Most of them were the older Vegas-era Elvises. I prefer the younger Jail House Rock era Elvis but the impersonators were very entertaining. One posed down on his knees and then sang, "I hope this suit doesn't tear." The competitors who advance from our state fair move on to the finals at the Florida state fair. 

So there you have it... a very full day at the Oklahoma State Fair! The fair isn't just for children and hillbillies. Lots of good shows, food and a little bit of education.