Monday, June 27, 2016

Erica's simple wedding DIY ideas.

The three most important things: cake, gifts & food! LOL

Last week, I blogged about my DIY centerpieces. (I placed them on top of doilies and they looked soooo good! So good that people were asking if they could take them home. I was very happy with them!) That was the only big project I did for my mom's wedding. All the other decorations I made were really simple... and affordable. (Even better!) I don't want to toot my own horn too much, but everything turned out very nicely, I got a lot of compliments from friends & family and most importantly, my mom & Mike loved how the reception hall turned out. *gushes*

My mom provided the ideas for the reception layout, table cloths and some wall hangings. I made:
* wedding favors
* painted wooden signs
* bouquets for the flower girls
* banners
* bulletin board "guest book"


For this blog, I'll go through each project I made by giving a brief tutorial. I'll also add the time it took to complete a project and the cost.

The wedding favors were some jolly ranchers & starlight mints wrapped in tissue paper and tied with yarn & a small thank you card. They each took about 5 minutes to make and cost less than $2. (Thank you clearance aisle at Michael's!)

My boss gave me a hand-me-down wooden sign last year when she & her husband moved houses. She bought it at a craft show but never had time to paint or embellish it. I couldn't find a use for it either but was too polite to turn it down. It sat in my closet for about a year. LOL
I found some wooden bride and groom chair hangers at the Dollar Spot in Target. I knew my mom had mentioned making paper wall decorations so I thought the wooden signs would add some nice dimension to her decorations. I painted the signs with her wedding colors and added glitter to the ampersand. That You & Me sign ended up being one of her favorite things! Took about 4 hours to paint and cost less than $10.

My mom was originally going to buy bouquets for the flower girls but something happened and I was called in to make them. I was presented with about 5 or 6 stems of varying silk flowers, yarn, bread ties and wired tulle fabric. I cut the silk flowers off their stems and attempted to arrange them identically on each bouquet. Then I tied them together with the bread ties, wrapped the wired tulle around that and finally tied it with yarn. My mom wouldn't confirm if the supplies came from The Dollar Tree but I'm thinking the cost was probably $10 per bouquet and it took me about an hour to make them both.

These banners were actually not as affordable as I had hoped but I used a coupon. LOL I used pre-cut card stock, scrapbook paper, yarn, scissors, glue stick & tape. Banners always look so nice & like they took a lot of effort but are actually pretty effortless to make!
First, I cut the letters out and arranged them on the banner pieces. Then I glued them down with a glue stick (liquid glue would have warped them). Lastly, I strung the pieces together with yarn and taped the yarn down on the backside. Both banners cost about $25 and took 5-6 hours to make.

I was hoping for more notes; the board didn't get as filled up as I expected.

I saved my favorite project for last! For Wes & my wedding gift, I decided to make a bulletin board of well wishes. The idea was for everyone to write a note and pin it to the board. Then at the end of the reception, my mom & Mike would have a fun keepsake of their wedding. The idea wasn't as well received as I had hoped. Only about a quarter of the guests left a note.
       I bought a bulletin board, easel (which my mom lost in her mess of stuff she had to take to the church so we ended up using my easel that I have for craft shows), stationary paper (leftovers from the banners), push pins and sharpies. It cost about $45 and took 10 minutes to set up.

125 wedding favors!

I made the decorations at my place, took it to my mom's for approval, then hauled it all to the church. The Reception Decoration Team (does RDT sound cool?) consisted of four people--myself, Wes, my cousin, Dianne, and one of my mom's former students--on the morning of the wedding. My mom gave us vague directions and we got it all set up in two hours. Afterward, the clean up team consisted of 6 people and we got it all taken down in an hour.

Thank goodness my mom & Mike are Catholic and the church isn't allowed to be decorated to taste. Otherwise, I would have had to decorate both the reception hall and church! All we had at the church were two vases of flowers at the altar.

For all you future creative brides out there, although putting wedding decor together yourself is a lot of work, it is totally doable. I took a week off work to get everything together. I didn't give myself a budget but I did shop sales and use coupons. I think if you get a good sense of what you want and give yourself enough time, a DIY wedding can be a fun and more personal experience than a traditionally planned wedding. But be warned, the idea of a DIY wedding is alluring until you have to actually execute it... then all the appeal vanishes and it becomes a lot of hard work and stress.

Monday, June 20, 2016

Erica's return to good ol'crafting...

I don't think I've done a DIY craft blog in a few months. I've been mainly focusing on craft shows (sewing pillows, pillows and more pillows!!) and throwing in some travelling on weekends when I was free :)
       But as mentioned in January, my mother is to wed this June and I am in charge of decorations. At first, she didn't know what she wanted for the wedding. Then she wanted too much. After talking it over, we settled on me making the table centerpieces and a couple of other small items. The "couple other small items" were super simple DIYs so they'll be featured together in next week's blog. This week, I wanted to share how I made the centerpieces.

Three out of twenty...

Flower centerpiece tutorial:
       Materials needed- emptied, washed & rinsed 14.5oz soup can
                                     fabric (I used suede)
                                     3.8in foam ball
                                     plastic flowers
                                     decorative trim
                                     scissors, wire cutters, tape measure, craft glue, hot glue gun & glue,                                                      Styrofoam glue (you probably don't really need three different types of glue)
So there's actually a lot of materials that's not pictured. I didn't realize how much I'd need when I first started doing this.

1. Measure & cut your fabric to be 9.5in long and 4.5in tall.

2. Glue one edge of the fabric to the soup can and set aside to dry.
If there's still some glue from where you peeled the label off, that's even better because you can stick your fabric to that ;)

3. Once the initially glued spot has dried, pull the fabric tight around the can and glue again to the middle of the can.

4. Lastly, wrap the remaining fabric all the way around the can and glue the edges of the fabric pieces together to meet. Set aside and let the glue completely dry.

5. Add on any trim, ribbon or decorative items to your can.

6. Glue the Styrofoam ball to the top of the soup can. 
       I used hot glue for this but you can probably use whatever type of glue you want. Now looking back on it, hot glue was a bad idea because it dried so quickly.

7. Cut the flowers and leaves off of the stem. Leave about 2 inches of the stem on the flower --this is what you will poke into the Styrofoam ball. I tried doing this with scissors but was more successful when I used wire cutters.
Wes actually did this step for me.

8. Stab those flowers into the Styrofoam balls!!
       I used an assortment of flowers and leaves. If I had taken a flower arrangement class, I would probably have a better idea of what flowers match and go well together. But since I haven't taken any classes on arrangements, I just did what I thought looked pretty.
I started with putting all of the large flowers in the ball. Then I added the smaller flowers. Lastly, I used the leaves to cover up any extra space. The goal is to cover the entire Styrofoam ball with flowers. If the flowers don't stick, put a dot of Styrofoam glue at the tip of the stem before poking it in.


Monday, June 13, 2016

Athena's first birthday!

Athena is not a fan of pictures. (>.>)

Our perfectly precious puppy turned one on June 9th!!
       If I was a blogger who had a human child, I'm sure I would be one of those annoying types who spend at least 6-10 blogs detailing all of the DIY decorations, cake, photography and every other detail involved in my child's first birthday party. Luckily for you, I don't have a human child so you'll only get one "my child is perfect and I'm a doting mommy blog" regarding Athena's first birthday.
       Actually, it's just a bunch of dog pictures. And who doesn't like dog pictures?

Athena's puppy birthday "cake."

At first, I wanted to take Athena to the dog park for her birthday. But, Sadie can't go to the dog park (she doesn't play nice with other dogs) and a few of Athena's puppy friends couldn't make it so we ended up just having a family birthday celebration at home. Then we walked her around the neighborhood and to the CVS. I waited with her in the parking lot while Wes went in for a few items. Athena got two compliments for her adorableness.
Athena and Sadie each got a piece, which they gobbled up and spent the next 10 minutes searching for crumbs.

A few weeks ago, I bought a dog themed picture frame at a craft show. I decided that we needed to give Athena a photo shoot for her first birthday. We attempted taking a family picture but Athena was not cooperating (and Wes was getting agitated & stressed out) so I gave up pretty quickly. After that, we had "cake"... more like a large frosted dog treat. Then it was time for presents.


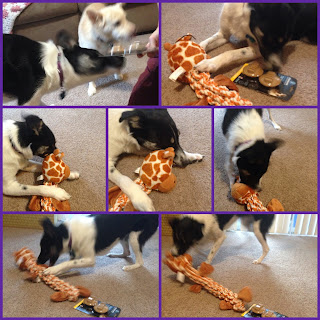
I got Athena a giraffe rope toy and Wes got her some refills for her Bento Ball toy. The refills ended up being a much better idea than the rope toy because she destroyed the toy in about an hour.  The toy's squeaker was inside the giraffe's head so the poor thing quickly got decapitated. Then she chewed through and unraveled all of the rope. LOL Maybe, I should have bought her a rubber toy. Remind me to keep that in mind for Christmas.

Giraffe rope toy...pre-destruction.

The entire "birthday party" lasted about 15 minutes. I'm about 80% sure that Wes thought the whole thing was retarded but he kept his mouth shut and participated. (I have an immensely supportive husband!) A friend of mine had a cookout for his dog's first birthday party and I threw Kensington a birthday party several years ago, so to me, this was perfectly normal. 
       When you're lacking something in your life, you spend a majority of your time learning to accept & appreciating what you do have. It's useless to dwell on the missing piece. But every now and then, that missing piece surfaces and you try to make up for it. For me, I made up for it by throwing a birthday party for my dog. It is silly and Athena had no idea what was going on but for me, I needed that "mommy moment."


Monday, June 6, 2016

Erica & Wes visit the Renaissance Festival.

       ONCE UPON A TIME... Alan and Erica journeyed to ye far off land of Muskogee on a quest to find enchanted weapons. They happened upon a castle of old ,where they were greeted by a jovial wench. She showed them many weapons. From the time Alan was a young lad, all he wanted to do was to hold ye magical ax and recite incantations. When he picked up thy ax, the largest grin appeared on his  round face and he shined brighter than the northernmost star. Poor Erica was not as lucky. She chanced upon thy giant bardiche but thou arms were too spindly to wield the weapon. She tried with all her might... she grunted and pulled and made horrid faces... but the weapon would not lift off thy ground. Then the court jester appeared and laughed a hearty ho ho ho! The bardiche was cursed to never leave thy wooden floor. The wench, jester, Alan and Erica all gave a boisterous laugh and merriment was had by all. THE END.


Just kidding, none of that happened. But Wes & I did go to the Renaissance Festival at the Castle at Muskogee last weekend for Alan's birthday. It was a pretty fun experience (minus the heat... walking around outside in the Oklahoma heat for an afternoon was terrible!) The fair was held on the "castle grounds" and it was set up to look like a medieval village. There were various stages with different performers every hour, a few bars & food vendors and lots of shops. We had a turkey leg, funnel cake and beer for lunch when we got there. Then we spent the rest of the afternoon exploring the grounds with Alan and his friends.


None of the weapons were enchanted but there was a historical society at the fair that had old medieval battle weapons. So my story wasn't completely made up! LOL The girl who volunteered at the booth was a history buff who shared factoids on the swords, axes and maces. And, she let us handle the weapons! Alan picked the heaviest thing for me to hold.

There were some ladies spinning wool into thread!

We went into just about every shop and saw each vendor. (and there were a lot!) My favorites were:
       *a craftsman who made wooden mugs and puzzle boxes,
       *a shop that sold replicas of armor, chain-mail and helmets and
       *a shop that demonstrated weaving, spinning and basket-making  
There was a lot of neat stuff but we didn't find anything that we couldn't do without so we left sans souvenir. 

The top right picture was from the Musical Blades performance. There is a guy in a white t-shirt sitting on the bench with a guitar. He wasn't part of the band and he didn't play the guitar. He just sat there with it.

We also saw two performances. One was a gypsy group called Wine & Alchemy. A woman sung and her band mates played various instruments. For their final song, she danced with a sword. The other performance we saw was the Musical Blades. They were a musical comedy troupe of pirates. Their act consisted of dirty jokes, original pirate themed songs and covers of hip hop songs. It was Wes' favorite part of the day. I've only been to one other medieval fair (the one in Norman) and I didn't really enjoy it but since Alan requested that we go for his birthday, we ventured out. I would say this Renaissance Festival was a good one. It had a variety of things to do and see and you could easily spend a day there. 
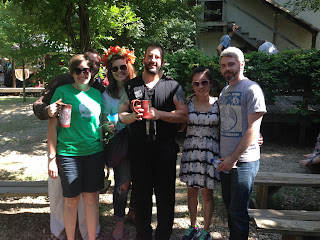
Erin, Matt, Melanie, Alan, me & Wes. HAPPY BIRTHDAY!!